

Group project | 2023 Summer | 3 months
Collaborated with Yuke Yang
Brief
Our project name, Infinity, is taken from Buzz Lightyear's famous catchphrase 'To infinity...and beyond!'. Under the name infinity, we wanted to create a kart that was both fast and rugged enough to ride the pavement. Instead of the traditional way of building a go-kart, we utilized a hand-held drill as the primary means of powering our kart and used wood as the main material to build our kart.
click below video to see infinity kart running
01
Process


step 1
Inspirations
• Cool & Minimal
• Elegant & Streamline
• Ergonomic structure
• Less weight & Faster speed
step 2
1:8 Model
• Use a Laser cutter to cut out pieces and glue them to see the basic shape.
• Testing the basic arrangement
• Figure out the right proportions
• Found problems with previous thought on rear and front gears and decided to add these after the main structure.


step 3
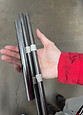
Making parts
Making necessary parts for steering and motor by using...
• AI drawing (dimensions & precise cutting)
• Band saw
• Table saw
• Metal cold saw
• Wood & Metal Drill
• Metal lathe
• Sanding machine


step 4
Steering
The next step is to make the steering part by using...
• 3D modeling (dimensions)
• Metal welding
• Sandblasting
• Spray paint


step 5
Motor
We decided to power the kart using a hand drill for its lower price and future use in other project.
We use chain to connect the drill with the wheel as a motor system.
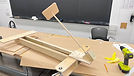
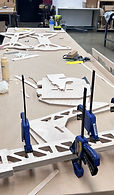
step 6
BUILDING BASIC STRUCTURE
• Quick work on building the large frame out of solid wood and plywood.
• Test seat and steering wheel height and position
• Get necessary data for the overall bodywork.
• Design steering structure and brake structure on the top side.
• Made a straight L-shaped block with one end for hand grips. When the hand lifts the device, the other end of the device touches the tire to provide friction, thus acting as a brake.


step 7
Modeling
• Use Solidworks for precise model building using CNC and multiple adjustments.
• Through weight reduction, improved ergonomics, and a unified design language
• Iterated the design to achieve better presentation and functional improvement
• Functional and aesthetically pleasing
step 9
Final model (1)
• CNC the main pieces and then fix some tolerance problems by hand sanding holes to ensure a close fit.
• Check if the new design is ergonomic and functional.
• By anchoring pieces with slots and screws, the final work is much stronger and lightweight than the previous one.


step 10
Final model (2)
• Add slot for the brake to improve the functionality
• Laser patterns to enhance visual effects and increase aesthetic details
• Separate layers by masking different layers with distinct colors
• Add a bumper strip at the back to prevent a collision
• Add ornamental tail fins to balance the weight between the front and back.
02
Final model


03
Reflection
• Had hard time learning how to break down building a karting kart into small steps.
• Spent time on model iterations for ergonomics and aesthetics.
• Like exploring new things and new areas.